How to Solve the Rubik’s Cube
Grab a cube and let’s go! Don’t give up. Ernö Rubik, the cube’s creator, took a month to solve it, but you will be impressing people in a few hours.
Step 1: Solve the 1st Layer
The first step is to form a yellow cross on top. The other side of each edge piece has to match the adjacent center. Here’s how:
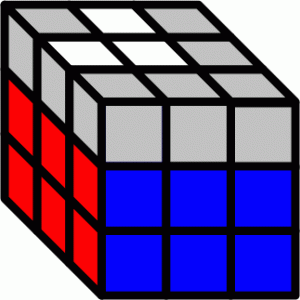
- Find the yellow center piece and hold the Rubik’s cube so it’s on top.
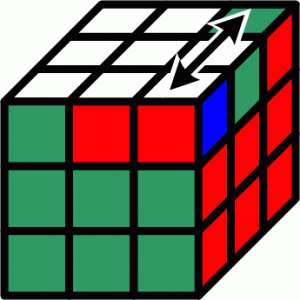
- Find the yellow & green edge piece and move it to the side with the green center.
- Turn the green side, the side with the green center, a quarter or half turn to get the yellow & green edge piece to the top.
- If necessary, flip the edge piece like this so the yellow side is up.

- Solve the other 3 edge pieces the same way. To prevent solved pieces from getting messed up, use the bottom layer to move pieces around as shown in the example.
When you have a cross, you’re ready to solve the corners.
Step 1 Continued: Solve 1st Layer
Your next mission is to solve the yellow corners and finish the 1st layer. Here’s how.
- Look for a yellow corner piece in the bottom layer. Something like this. If you find one, skip to step 3.
- No yellow corners on the bottom? Okay, you have to move an unsolved yellow corner piece from the top layer to the bottom layer. Keeping yellow on top, hold the cube so the unsolved corner is at the front-right, like this, and do any one of the moves in step 4 to move it to the bottom.
- Turn the bottom layer so the yellow corner piece is under its target position.
- Now check the corner’s bottom color.
- If the bottom color matches the right side center piece, do these turns:
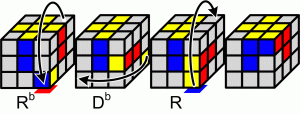
- If the bottom color matches the front center piece, do these turns:
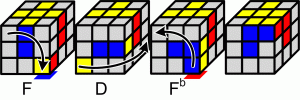
- If the bottom color matches the top layer center piece, flip the corner using these turns, then go to step 3.

Repeat steps 1 – 4 until all four corners are solved.
Step 2: Solve Second Layer
Move 1 shifts an edge piece from the bottom-middle to the middle-left of the front side. Though it’s not fast, you can solve the second layer using this move only. Watch a longer demo.
Look for an unsolved 2nd layer edge piece in the bottom layer. If you find one, turn the bottom to align the edge piece with a center, making a T on one of the side faces. There are 3 possible cases.
| Case 1 | When the color on the bottom of the T matches the side to the left, do move 1 with the T in front to solve the piece. | 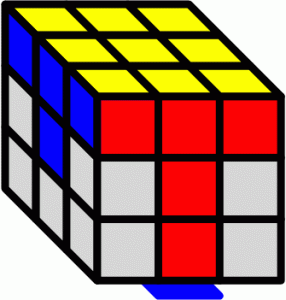 |
| Case 2 | When the color on the bottom of the T matches the side to the right, do move 1 with the T on the left to flip the piece. (When you are ready to get a little more advanced, use this alternate move to solve the piece.) | 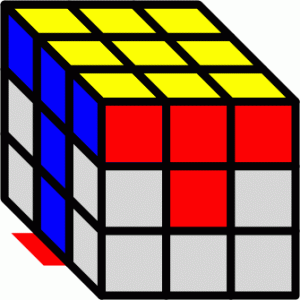 |
| Case 3 | When there are no solvable pieces on the bottom, do move 1 with an unsolved piece in the front-middle-left position (like the red-green piece shown to right) to move the piece to the bottom. | 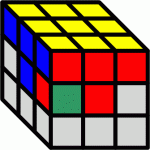 |
Step 3: Make a Cross on the Third Layer
The next step is to form a cross on the 3rd layer using move 2. This time, however, you don’t have to line up the sides.
Flip the cube so the solved layers are down. Move 2 works when the left and back edge pieces match the center. Can you rotate the cube to get that pattern?
If not, do move 2 with any face in front until you can.
The mnemonic is a little different for this one. The first 3 turns are clockwise and the last 3 turns are counterclockwise. “Back” indicates the change in direction.
Step 4: Position the Corners
You place the layer 3 corner pieces with move 3, which swaps the two top-right corners. Oddly enough, there are always 2 corners that can be placed correctly before you do the move. The trick is to find them.
Case 1: When one or no corners are correctly placed, turn the top layer and check again to get to case 2. Keep looking until you find them!
Case 2: When adjacent corners need to be swapped, orient cube with the bad corners at the top-right and do move 3.
Case 3: When diagonal corners need to be swapped, do move 3 twice, the first time with any face forward to get to case 1.
Step 5: Fix the Corners
Solve the corners using move 4, which flips 3 corners but leaves the top-left-front corner alone. It´s the key to setting up the move, so let´s call it the NC (no change) corner.
There are three cases.
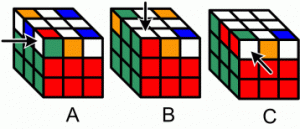
- If no corners are solved (fig. A), start move 4 with the top color on the left face of the NC corner. To remember, think “none left”.
- If 1 corner is solved (fig. B), start the move with the solved corner in the NC position. Logical, no?
- If 2 corners are solved, put a bad corner in the NC corner with the top color towards the front (fig. C). Think “too forward.”
Step 6: Fix the Edges
You take care of any bad edges in the third layer with move 5, which shifts the front edge to the back side, the back edge to the right, and the right edge to the front. If the front edge needs to go to the right instead, do the move twice or, better yet, reverse both of the U turns.
The setup is simple. If one side is solved, turn your cube so the solved side is on the left.
Case 1: If all edges are bad, do move 5 once with any face forward. You´ll end up with one good edge.
Case 2: If the front edge belongs on the back when the solved edge is on the left, do move 5.
Case 3: If the front edge belongs on the right when the solved edge is on the left, reverse the Up turns when you do move 5, or, if you can’t get enough, to move 5 once to get case 2.


